

목차
[WAT-S032] 18B20 온도 센서 모듈
본 제품은 [WAT-SK114]중요한 아두이노 센서키트(초급) 중 32번째 모듈로 18B20 온도 센서 모듈입니다.

핀 번호
| 번호 | 핀명 | I/O | 기능 |
|---|---|---|---|
| 1 | G | GROUND | GROUND |
| 2 | R | VCC | VCC |
| 3 | Y | Signal Out | 센서 디지털 출력 |
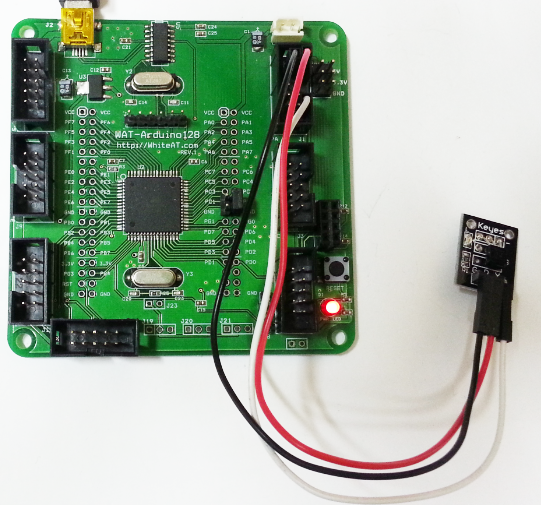
WAT-Arduino128 예제
핀 연결
| 번호 | I/O | WAT-Arduino128 |
|---|---|---|
| 1 | G | GROUND |
| 2 | R | 5V |
| 3 | Y | PA0 |
소스코드
최신 소스코드는 [파일]=>[예제]=> [WhiteAT]=> [Sensor37] => [32_18B20] 에 있으며
라이브러리는 아두이노 개발환경 을 참조하세요
/*
 중요한 아두이노 센서키트 37종 예제 중 32 번째
 WAT-Arduino128 과 18B20 온도 센서 예제입니다.

 WAT-Arduino128 : https://kit128.com/goods/view?no=64
 37종 센서: https://kit128.com/goods/view?no=114

 출처: http://whiteat.com/Arduino
*/

#include <OneWire.h>

// DS18S20 Temperature chip i/o
OneWire ds(PA0); // on pin 10

// 프로그램 시작 - 초기화 작업
void setup()
{
 Serial.begin(115200); // 시리얼 통신 초기화
 Serial.println("Arduino Examples - 18B20 Temperature Sensor");
 Serial.println(" https://docs.whiteat.com/?p=1292");
}

int temperature = 0;
void loop(void) {
 byte i;
 byte present = 0;
 byte data[12];
 byte addr[8];

 ds.reset_search();
 if (!ds.search(addr)) {
 Serial.print("No more addresses.\n");
 ds.reset_search();
 return;
 }

 // Serial.print("R=");
 // for( i = 0; i < 8; i++) {
 // Serial.print(addr[i], HEX);
 // Serial.print(" ");
 // }

 if (OneWire::crc8(addr, 7) != addr[7]) {
 Serial.print("CRC is not valid!\n");
 return;
 }

 if (addr[0] == 0x28) {
 // Serial.println("Device is a DS18B20 family device.");
 }
 else {
 Serial.print("Device family is not recognized: 0x");
 Serial.println(addr[0], HEX);
 return;
 }

 ds.reset();
 ds.select(addr);
 ds.write(0x44, 1); // start conversion, with parasite power on at the end

 delay(1000); // maybe 750ms is enough, maybe not
 // we might do a ds.depower() here, but the reset will take care of it.

 present = ds.reset();
 ds.select(addr);
 ds.write(0xBE); // Read Scratchpad

 // Serial.print("P=");
 // Serial.print(present,HEX);
 // Serial.print(" ");
 for (i = 0; i < 9; i++) { // we need 9 bytes
 data[i] = ds.read();
 // Serial.print(data[i], HEX);
 // Serial.print(" ");
 }
 temperature = (data[1] << 8) + data[0];
 temperature = (6 * temperature) + temperature / 4; // multiply by (100 * 0.0625) or 6.25

 Serial.print("T=");
 Serial.print(temperature / 100); Serial.print("."); Serial.println(temperature % 100);

 // Serial.print(" CRC=");
 // Serial.print( OneWire::crc8( data, 8), HEX);
 // Serial.println();
}
결과 화면
현재 온도가 출력됩니다. 중간에 입김을 불었더니 31도까지 올라갔습니다.

Arduino UNO R3 예제
핀 연결
| 번호 | I/O | UNO R3 |
|---|---|---|
| 1 | G | GROUND |
| 2 | R | 5V |
| 3 | Y | 2 |

소스코드
최신 소스코드는 [파일]=>[예제]=> [WhiteAT UNO]=> [Sensor37] => [32_18B20] 에 있으며
라이브러리는 아두이노 개발환경 을 참조하세요
/*
 중요한 아두이노 센서키트 37종 예제 중 32 번째
 UNO 와 18B20 온도 센서 예제입니다.

 37종 센서: https://kit128.com/goods/view?no=114
 UNO R3 : https://kit128.com/goods/view?no=337
 출처: http://whiteat.com/Arduino
*/

#include <OneWire.h>

// DS18S20 Temperature chip i/o
OneWire ds(2); // on pin 10

// 프로그램 시작 - 초기화 작업
void setup()
{
 Serial.begin(115200); // 시리얼 통신 초기화
 Serial.println("Arduino Examples - 18B20 Temperature Sensor");
 Serial.println(" https://docs.whiteat.com/?p=1292");
}

int temperature = 0;
void loop(void) {
 byte i;
 byte present = 0;
 byte data[12];
 byte addr[8];

 ds.reset_search();
 if (!ds.search(addr)) {
 Serial.print("No more addresses.\n");
 ds.reset_search();
 return;
 }

 // Serial.print("R=");
 // for( i = 0; i < 8; i++) {
 // Serial.print(addr[i], HEX);
 // Serial.print(" ");
 // }

 if (OneWire::crc8(addr, 7) != addr[7]) {
 Serial.print("CRC is not valid!\n");
 return;
 }

 if (addr[0] == 0x28) {
 // Serial.println("Device is a DS18B20 family device.");
 }
 else {
 Serial.print("Device family is not recognized: 0x");
 Serial.println(addr[0], HEX);
 return;
 }

 ds.reset();
 ds.select(addr);
 ds.write(0x44, 1); // start conversion, with parasite power on at the end

 delay(1000); // maybe 750ms is enough, maybe not
 // we might do a ds.depower() here, but the reset will take care of it.

 present = ds.reset();
 ds.select(addr);
 ds.write(0xBE); // Read Scratchpad

 // Serial.print("P=");
 // Serial.print(present,HEX);
 // Serial.print(" ");
 for (i = 0; i < 9; i++) { // we need 9 bytes
 data[i] = ds.read();
 // Serial.print(data[i], HEX);
 // Serial.print(" ");
 }
 temperature = (data[1] << 8) + data[0];
 temperature = (6 * temperature) + temperature / 4; // multiply by (100 * 0.0625) or 6.25

 Serial.print("T=");
 Serial.print(temperature / 100); Serial.print("."); Serial.println(temperature % 100);

 // Serial.print(" CRC=");
 // Serial.print( OneWire::crc8( data, 8), HEX);
 // Serial.println();
}
결과 화면
현재 온도가 출력됩니다. 중간에 입김을 불었더니 31도까지 올라갔습니다.
제품 구매
[WAT-SK114]중요한 아두이노 센서키트(초급)은 https://kit128.com/goods/view?no=114 에서
[WAT-S032] 18B20 온도 센서 모듈은 https://kit128.com/goods/view?no=432 에서 구매하실 수 있습니다.
