

목차
I2C LCD1602 모듈
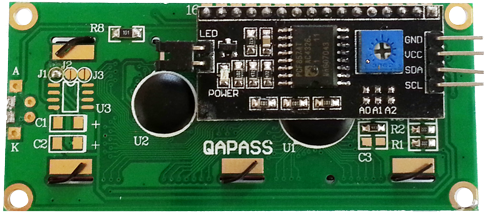
I2C LCD1602 는 16×2 배열의 캐릭터 LCD 를 I2C 로 제어할 수 있는 모듈입니다. 전원 2개핀과 2개의 핀으로 제어할 수 있어 회로를 간단히 꾸밀 수 있습니다.
I2C LCD1602 사진

컨트롤 신호
4개의 핀이 사용되며 SCL, SDA, VCC, GND 핀입니다.
| 핀명 | 기능 |
|---|---|
| SCL | I2C SCL 신호 |
| SDA | I2C SDA 신호 |
| VCC | 5V |
| GND | GND |
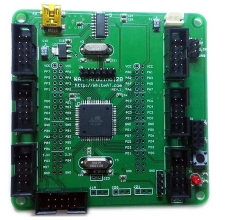
WAT-Arduino128 예제
부품 목록
| 부품명 | I2C LCD |
|
|---|---|---|
| 기능 | TEXT 출력 | |
| 수량 | 1 | |
| 판매처 | https://kit128.com/goods/view?no=80 |
| 부품명 | WAT-Arduino128 |
|
|---|---|---|
| 기능 | 아두이노 | |
| 수량 | 1 | |
| 판매처 | https://kit128.com/goods/view?no=64 |
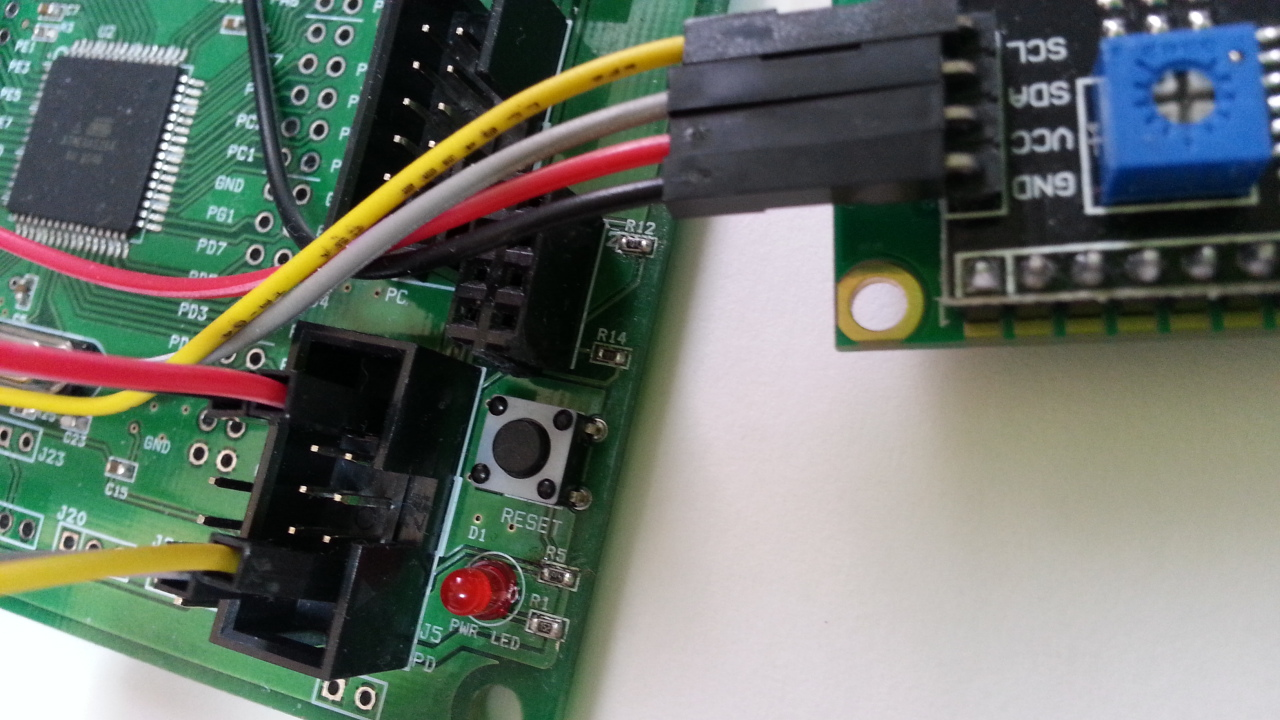
핀 연결
아래와 같이 I2C LCD와 WAT-Arduino128 핀을 연결합니다.
| I2C LCD핀 | WAT-Arduino128 핀 |
|---|---|
| SCL | PD0 ( SCL) |
| SDA | PD1 (SDA) |
| VCC | 5V |
| GND | GND |
소스코드
소스코드는 [파일]=>[예제]=>[WhiteAT] =>[CLCD_I2C] 에 있습니다. (라이브러리는 https://docs.whiteat.com/?page_id=5449 참조)
/*
I2C LCD TEST
LCD 에 텍스트 출력하고 1초마다 백라이트를 ON/OFF 하는 예제

WAT-Arduino128
LCD I2C Module

출처: http://whiteat.com/Arduino

부품
. WAT-Arduino128 : https://kit128.com/goods/view?no=64
. I2C LCD : https://kit128.com/goods/view?no=80
*/

#include <Wire.h>
#include <LiquidCrystal_I2C.h>

// I2C LCD 기본 어드레스는 0x27 또는 0x3F
LiquidCrystal_I2C lcd(0x27);

// 프로그램 시작 - 초기화 작업
void setup()
{

 // 자동으로 I2C address 설정
 lcd = LiquidCrystal_I2C(GetAddress());
lcd.begin (16,2); // 16 x 2
}

// 계속 실행할 무한 루프
void loop()
{
lcd.setBacklight(HIGH);
lcd.setCursor(0,0);
lcd.print("WAT-Arduino128 ");
lcd.setCursor(0,1);
lcd.print("LCD I2C Module ");
delay(1000);
lcd.setBacklight(LOW);
delay(1000);
}


// I2C address 찾기
byte GetAddress()
{
 Wire.begin();
 for (byte i = 1; i < 120; i++)
 {
 Wire.beginTransmission(i);
 if (Wire.endTransmission() == 0)
 {
 Serial.print("Found address: ");
 Serial.print(i, DEC);
 Serial.print(" (0x");
 Serial.print(i, HEX);
 Serial.println(")");
 return i;
 delay(10);
 }
 }
}
Arduino UNO R3 예제
부품 목록
| 부품명 | I2C LCD |
|
|---|---|---|
| 기능 | TEXT 출력 | |
| 수량 | 1 | |
| 판매처 | https://kit128.com/goods/view?no=80 |
| 부품명 | 아두이노 UNO R3 |
|
|---|---|---|
| 기능 | 아두이노 모듈 | |
| 수량 | 1 | |
| 판매처 | https://kit128.com/goods/view?no=337 |

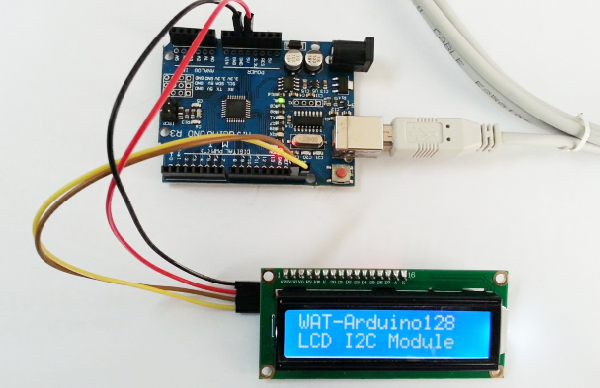
핀 연결
아래와 같이 I2C LCD와 Arduino UNO R3 핀을 연결합니다.
| I2C LCD핀 | Arduino UNO R3 핀 |
|---|---|
| SCL | SCL (우측 상단에 위치) |
| SDA | SDA(우측 상단에 위치) |
| VCC | 5V |
| GND | GND |
소스코드
소스코드는 [파일]=>[예제]=>[WhiteAT UNO] =>[CLCD_I2C] 에 있습니다.
/*
 I2C LCD TEST
 LCD 에 텍스트 출력하고 1초마다 백라이트를 ON/OFF 하는 예제

 출처: http://whiteat.com/Arduino

 부품
 . Arduino UNO R3 : https://kit128.com/goods/view?no=337
 . I2C LCD : https://kit128.com/goods/view?no=80

 연결
 Arduino UNO R3 I2C LCD
 -------------------------------------------------
 SCL I2C SCL
 SDA I2C SDA

*/

#include <Wire.h>
#include <LiquidCrystal_I2C.h>

// I2C LCD 기본 어드레스는 0x27
LiquidCrystal_I2C lcd(0x27);

// 프로그램 시작 - 초기화 작업
void setup()
{
 // 자동으로 I2C address 설정
 lcd = LiquidCrystal_I2C(GetAddress());
 lcd.begin (16,2); // 16 x 2
}

// 계속 실행할 무한 루프
void loop()
{
lcd.setBacklight(HIGH);
lcd.setCursor(0,0);
lcd.print("WAT-Arduino128 ");
lcd.setCursor(0,1);
lcd.print("LCD I2C Module ");
delay(1000);
lcd.setBacklight(LOW);
delay(1000);
}


// I2C address 찾기
byte GetAddress()
{
 Wire.begin();
 for (byte i = 1; i < 120; i++)
 {
 Wire.beginTransmission(i);
 if (Wire.endTransmission() == 0)
 {
 Serial.print("Found address: ");
 Serial.print(i, DEC);
 Serial.print(" (0x");
 Serial.print(i, HEX);
 Serial.println(")");
 return i;
 delay(10);
 }
 }
}
Troubleshooting
I2C Address 확인
I2C LCD 의 기본 address 는 0x27 이나 모델에 따라 0x3F 인 경우도 있습니다.
I2C address 찾기문서(https://docs.whiteat.com/?p=673) 를 참조하여 address 을 먼저 확인하셔야 합니다.
Text 밝기 확인
Text 가 흐리거나 어둡게 나올 경우 가변저항(뒷면 파란색 부품)을 작은 십자 드라이버로 약간 돌려 가면서 Text의 밝기를 조절할 수 있습니다.
